The pictures below are some candids during the process so far.
Sunday, November 15, 2009
A Lot of Work, A Lot of Laughs
The pictures below are some candids during the process so far.
Mudding and Taping and then Mudding and Taping AGAIN!
Danny started out fine, as he gave us a really great quote and made room for us in his schedule very fast. However, the honeymoon operiod was short and Danny...well became a pain in the ass. Danny first needed some cash in advance as he needed to take care of some personal things..no probelm. then danny needed a little more cash...we were genrrous. Then Danny called us one Saturday night (when we happened to be at the spa) looking for some more money because he needed to go drinking with his brother....Then Danny had sporadic attendance at the house. Then Danny was sooooooo close to finishing, but then he went on a bender and we didn''t hear from him for a few days. Then Danny came in late on a Sunday to finish as he needed to get back home on the Monday. We left him, as we had also entrusted him with the keys to our house....and when we came back the next day there were more than a few spots NOT DONE and our prized drywalling posession a "Rotozip"was gone. Since then Markus has literally harrassed him by phone and email and we have never heard from Danny again.
The end result was that we had to finish sanding the spots he left undone and then had to go back over all the screw holes and remud as they were poorly done and we even remudded some of the larger seams.
Lesson learned on our opart for not being so damn trustinbg of people/contrators. We could have been much more strict with him, but thought that the guy needed a break and that we could trust him to do the job completely.
Lesson learned on Danny's part: Keep a low profile in Regina because I am still not over losing my Rotozip!!!!
Drywalling #2
The pictures below are of the house at various stages in the drywalling process.


Drywalling
The drywalling process started for us by making a large order to Kenroc building supplies. Talking with a neighbour of dads we were persuaded to have Kenroc deliver the drywall and use a boom to lift up the drywall from the truck and put it through our second story window, so the guys would not have to carry it up the stairs. Absolutely ridiculous. The boom operator was a little sketchy and maybe not the sharpest tool in the box and dismantling a 1913 window so drywall could be put through it was also not the easiest task (and a huge pain in the ass to put back together). When it was all said and done we had 180 sheets of drywall in our house.
The pictures below are of the drywall being delivered. The last picture I think is quite artistic!
So Its Been Awhile.....
We both knew this was going to be a crazy undertaking, but I don't think we could foresee what it exactly would be and feel like. It has been very weird going back to work and not living at our house. Getting ready everyday in someone else s house, having supper at someone else's house and then going to bed on a blow up mattress every night! We have actually started to really miss our house, that we both when ever we can stop by during the week to get the mail and be in the house, last night we even rented a movie and watched it upstairs "just like old times" as we wanted to be in our space again.
Basically we have decided that we will move back to the house over our Christmas vacation in December, whether the house is done or not (and it won't be) - this way we have enough time to unpack things that we can and to clean properly. Then we will just continue to live here and continue to work at the house bit by bit and put it all back together! We will also be having another house warming party once the house is back to normal, so clear your schedules for sometime in the spring of 2012!
Thursday, August 20, 2009
Our Biggest Splurge
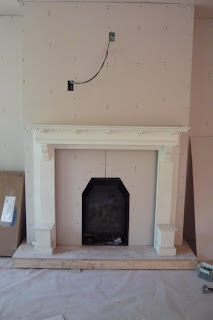
When the demolition started and we were discussing the possible upgrades we could make, one of them was to get two gas fireplaces, one for the living room and one for our bedroom. Although at first I thought I would want to keep the fireplaces as they were, as there is something to be said about a wood fire on a cold day, the practicality of it just was not there. Wood fires require you to be there and maintain them, whereas a gas fireplace can be turned on and off with the simple click of a button. In addition the heat is instant and they are easy to manage. After a few discussion we decided to get Wheatland Fireplaces http://www.wheatlandfireplace.com in and provide us with a quote. Before receiving the quote Markus had a sit down chat with me and let me know gently that if the quote was near or over $10,000 we would have to really reconsider this decision as we have a limited budget....In the end we got the fireplaces!!!
A few things had to happen before the fireplaces could get installed. First we had to take out the old fireplaces, close up the hole and build a frame for the new fireplaces to sit on. We built each fireplace on a little hearth and built the wall out from the original wall just a bit. Then we had to have two holes cored out of the brick so that the fireplaces could be vented - This was really cool to see as they use a huge drill and you could watch the brick get hotter and hotter from the outside as they got closer and closer to drilling through. Finally, the fireplaces were installed and they look awesome! the final touches of course will come with tiling around each of the fireplace's, but even right now they look pretty cool!
Monday, August 3, 2009
Information about Spray Foam
- Made from Recycled Plastics
- Made from Vegetable oil
- Zero Ozone Depletion Substance
- Ecological Insulation
Insulation : Independent laboratory tests confirm the on site long term thermal performance of POLARFOAM PF-7300-0 SOYA spray foam insulation in the building envelope system increases thermal performance of the building envelope. The long term minimum insulating value is R-6/1 " RSI 1.05/25mm.
Air Barrier: Research shows that 40% of building heat loss can be attributed to air leakage conducted through the building envelope. Tests for air leakage conducted by an independent laboratory recognized by the CCMC show that POLARFOAM PF-7300-0 SOYA exceeds 500 times the requirements of the NBC as an air barrier material.
These results confirm that POLARFOAM PF-7300-0 SOYA is one of the highest performance air barrier materials on the market and this feature is the key element in an air barrier system that meets the objectives of the NBC
By creating a sealed air barrier and eliminating air filtration POLARFOAM PF-7300-0 SOYA does not allow wall condensation, that can often result in mold, mildew and wall degradation.
Vapour Barrier: Water vapour permeance is the speed to which water goes through a homogeneous material. The National Building Code, stipulates that a vapour barrier must have a water vapour permeance less than 1.05 PERM (60 ng/Pa*s*m2)
* 75 mm of POLARFOAM PF-7300-0 SOYA spray applied on an exterior gypsum board = 44 ng / Pa*s*m2 (0.77 PERM)
* 75 mm of POLARFOAM PF-7300-0 SOYA spray applied on concrete blocks = 22 ng / Pa*s*m2 (0.38 PERM)
The Joys of Insulation
Saturday, July 25, 2009
New Electricity!
Monday, July 20, 2009
A Building We Will Go
The first decision we had to make was how we were actually going to build these walls. We debated two options:
1. build 2x4 walls and in the end have deeper window wells and adjust accordingly after
2. rip the 2x4's and build the walls to fit the existing windows
we went with option number one as it seemed the most logical to us. We figured that it would be less work in the end to adjust the depth of the windows, than it would be to try and make walls fit to the windows.
And so it began....and now July 20th...we are almost done. We have been working on building walls for about 4 weeks straight now and have finally just about finished all the framing we need to do. For the most part we have not encountered too many problems as we have been framing. The majority of the walls are built with 2x4's, and in some sections because of space we have had to make 2-3 separate frames to do a wall. The most difficult area we anticipated was the west outside wall that runs from the front of the house to the basement, and under the stairs. Once we had ripped everything down, the space under the stairs varied but for the most part we only had 2 inches to work with. This posed a problem as we had been building all other walls using a 3 1/2 spacing. The other issue with this wall was that it was so big. Because it runs the length of the house and all the way up the stairs, we needed to build at least 2 large and separate frames to cover the wall at its largest point. After much deliberation we decided to try and build the wall on the flat and tie into the stairs where we could to stabilize the frame. To our surprise this worked very well and went incredibly fast compared to many other walls we built. The following is a selection of pictures that shows the various frames we have built around the house. The last few pictures I will post will be of the wall built on the flat!
Friday, July 17, 2009
How Can Something so Small be so Crappy?
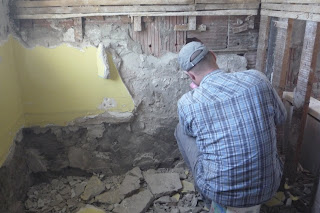
The next surprise we found in this little bathroom was when we went to remove the tile on the floor. Again we realized that chipping away the tile by itself was a ridiculous idea as it came out piece by piece. After we put a sledge hammer to a part of the floor and investigated further, we found that somebody had poured at least 4 inches on concrete to make the bathroom floor before putting tile on. Our only assumption was that someone was attempting to make a bomb shelter, or assumed that there would be a lot of water spilling on the floor, because otherwise there really is no rational explanation. Again, Markus took on the job of chipping out the 4 inches of concrete over a series of days, and finally the bathroom was clear.
Eliminating the Boiler
After making a few phone calls we decided to go with Douglas Plumbing and Heating. We met with the owner Neil Douglas, and liked him right away. He was honest, helpful and knew his stuff. Thus the move to forced air began.
Before Neil and his crew could come in and begin work, Markus and I had to remove the majority of the pipe that was running through the walls to the radiators, and remove the pipe in the basement that was connected to the boiler. We removed pipe from the house by cutting through it with a reciprocating saw. We fortunately found a deal at Canadian Tire for a Mastercraft reciprocating saw for $39.99. In addition to this great price, we were also fortunate enough to have teenagers working the return desk when we returned our "broken" saws multiple times, as the may have bent once or twice as we cut through the pipes.
The biggest job came when we had to remove the actual radiators from the house. We debated for quite some time as to what would work best, as the radiators on average (minus water) weighed in at over 200 pounds. I advertised them on Used Regina and Kijiji, but nobody wanted to take them off of our hands, so we were left with the task of removing them ourselves. Markus did some research on the net and found that really the best solution was to smash them to pieces. On our second "work weekend" with friends, Markus my dad and our friend Blair smashed the radiators into pieces with a sledge hammer and hauled them to the bin. The smashing of the radiators actually went faster than we thought, but dad had a few minor cuts and abrasions afterwards from the pieces of radiator that flew up at him as he smashed away.
Thursday, July 16, 2009
Death By Plaster
The first room we tested was our small knick-knack room upstairs - as we wanted to see what was behind the walls and how easy it would be to take off. The second room came down almost by accident as Markus, my dad Peter, our friend Don and I were finishing taking down the trim in the house one weekend. Being a bit bored, as we worked in the living room, I started to bang at the wall and the plaster started falling. We all looked at each other and shrug our shoulders and pretty soon there was a gigantic pile of plaster in the middle of the room. The reaming rooms we cleared of plaster on two different "work weekends". The wooden lath cam down over a series of weeks, with Markus and I working after school and on the weekends.
Taking down the plaster and wooden lath has to be one of the dirtiest and crappiest jobs around. The dust is so fine and chokes you if you don't have a respirator on. The dust also goes EVERYWHERE and we are still sweeping it up around the house. We are in debt to the following friends who dared to come out and do some destruction with us:
-Peter Sawchyn
-Dominic Rubrecht
-Blair Litzenberger
-Don Balas
-Dan Innes
-Dan Fleishaker
-Chris Beingessner
-Steve Torgerson
-Kendra Walker
The worst sections of pulling off plaster we hit were in the corners of the bay windows and the bathroom walls. In these specially selected spots, somebody had decided to use an industrial diamond shape wire to ensure that the plaster stayed on. HOWEVER, trying to remove said wire piece from wall after it has been on for a 100 years was a bit ridiculous and resulted in many cuts and sore muscles.
The following is a selection of photo's from our destruction of the plaster!