So our first job to do,before we could start the demolition, was to remove all of the wooden trim from the two floors. This included door trim, baseboards, and window trim. Markus and I pulled all the nails from the boards as soon as we removed them, labeled them, and then for the doors and windows, we wrapped all the corresponding parts together, so we would know 6 months later which piece went where. I hope this time spent in the beginning will pay off in a few months when we will have to start digging through the ridiculous pile of wooden trim in our basement, find the right parts and begin refinishing them.
Monday, July 13, 2009
Step #1: Remove Wood Trim
One of the best selling features of this house was that the majority of the wooden trim was NOT painted over! In the Cathedral area, it seems it is harder and harder to find an older house that someone hasn't decided to be lazy and just paint the trim.
So our first job to do,before we could start the demolition, was to remove all of the wooden trim from the two floors. This included door trim, baseboards, and window trim. Markus and I pulled all the nails from the boards as soon as we removed them, labeled them, and then for the doors and windows, we wrapped all the corresponding parts together, so we would know 6 months later which piece went where. I hope this time spent in the beginning will pay off in a few months when we will have to start digging through the ridiculous pile of wooden trim in our basement, find the right parts and begin refinishing them.


So our first job to do,before we could start the demolition, was to remove all of the wooden trim from the two floors. This included door trim, baseboards, and window trim. Markus and I pulled all the nails from the boards as soon as we removed them, labeled them, and then for the doors and windows, we wrapped all the corresponding parts together, so we would know 6 months later which piece went where. I hope this time spent in the beginning will pay off in a few months when we will have to start digging through the ridiculous pile of wooden trim in our basement, find the right parts and begin refinishing them.
Let's Renovate!
Our house by no means was ever "unlivable", although the second floor bathroom left something to be desired with the plywood covering the holes in the water closet and the old cast iron tub with the shower head that could only let out a trickle, the remainder of the house was in good shape considering its age and we were quite happy.
Deciding to undertake a major renovation, like we are doing now, seriously took the last three years of living in this house and chatting with each other about the possibilities. It also took the last three years for us to envision the true potential of this house, experience all the "nuisances", and figure out a game plan. After last summer when we had returned home from our travels and were settling down to start teaching again, we decided that this Spring would be the time to do the renovations. We decided to do them now as we had been very fortunate the last three summers to travel extensively, if we looked into the future we saw ourselves starting a family and neither of us wanted to do renovations with little kids around, and finally we were financially stable enough to embark on such a project.
After we decided that we would actually do this project and could see ourselves pulling it off, we spent the next few months talking about a game plan...How would we start? would we live in the house during the renovation? when would we start? what type of help would we need? who should we call to come in a do our furnace? insulation? wiring? what was our time line? what if we didn't meet our time line? etc, etc.
In the end we decided that as soon as it was warm enough for us to have no heat in the house and the water lines to the boilers wouldn't freeze and break, we could begin!
Official Start Date: April 11th, 2009
Deciding to undertake a major renovation, like we are doing now, seriously took the last three years of living in this house and chatting with each other about the possibilities. It also took the last three years for us to envision the true potential of this house, experience all the "nuisances", and figure out a game plan. After last summer when we had returned home from our travels and were settling down to start teaching again, we decided that this Spring would be the time to do the renovations. We decided to do them now as we had been very fortunate the last three summers to travel extensively, if we looked into the future we saw ourselves starting a family and neither of us wanted to do renovations with little kids around, and finally we were financially stable enough to embark on such a project.
After we decided that we would actually do this project and could see ourselves pulling it off, we spent the next few months talking about a game plan...How would we start? would we live in the house during the renovation? when would we start? what type of help would we need? who should we call to come in a do our furnace? insulation? wiring? what was our time line? what if we didn't meet our time line? etc, etc.
In the end we decided that as soon as it was warm enough for us to have no heat in the house and the water lines to the boilers wouldn't freeze and break, we could begin!
Official Start Date: April 11th, 2009
The Real Reason
The real reason for this blog is to post about our current renovation of our first and second floor. This is the biggest project either of us has ever considered doing, and has taken us the last 3 years to mull over in our heads and prepare ourselves for the inevitable craziness that will exist for the next few months.
Although we are already in the thick of it, I am going to start at the beginning and hopefully I can catch myself up to regular posts as the project progresses (this whole Blog thing takes way more time than I thought)
Sunday, July 12, 2009
Renovation #2: Conquering the Backyard
As a wedding present in the fall of 2006, my mom and dad helped Markus and I redesign and landscape the backyard. Originally it had a basic patch of grass and a few flowers beds/mounds of dirt around the perimeter of the the yard. We decided that we would tear out the existing sidewalk and replace with paving stones. As well, we would make a small area for grass and redefine the flower beds, eliminating some of the ones that were doing nothing. Finally we built brand new back steps to the back porch.
The following spring in 2007, my dad helped Markus and I design and build an overhang from the garage that would serve to define the patio space. That spring Markus and I planted Hops at each of the posts (thanks to Don Balas' advice), so we would have a vine growing up and over the overhang.
This is what the back yard looks like!


The following spring in 2007, my dad helped Markus and I design and build an overhang from the garage that would serve to define the patio space. That spring Markus and I planted Hops at each of the posts (thanks to Don Balas' advice), so we would have a vine growing up and over the overhang.
This is what the back yard looks like!
Saturday, July 11, 2009
Renovation #1: Conquering the Third Floor
The first renovation we decided to do was to gut the third floor living space. Initially this area had been a kids room, storage area, and once a rented suit. When we bought it it was divided into three separate rooms (a kids room, 'reading area' and storage area with old counter tops and plumbing for a kitchen). Our first vision for this area was to make a large bathroom, as the second floor bathroom was small and in poor shape. After some hard thinking and a wonderful design by my father Peter, the official vision for the third floor was developed. The final plans had 3/4 of the space as a family room and the remaining 1/4 as a large bathroom.
We began demolition early in January as our initial wish was to have it done by our wedding day in July. However, as most renovations go, we were still doing work that July as our wedding day approached. Even though we did not get it done for the wedding, the amount of time we took to do it paid off as it turned out wonderful and we now use it constantly.
Some of the improvements we made were:
1) shoveled out 60 "industrial" sized garbage bags of sawdust that once acted as some type of insulation and replaced all walls, knee wall, and ceiling with proper insulation
2) Removed 1/4 inch plywood that was acting as wall covering and replaced with proper drywall
3) Added a commercial toilet that cost close to $800 due to the slope needed to drain toilet to stack, However, NOTHING gets stuck in the toilet now!
4) Added a double sink vanity, extra deep tub, and built ourselves a large walk in shower consisting of a bench and double shower heads.
Here is what the finished third floor looks like, I can't seem to find our "before" pictures right now so I will post them when I do!


We began demolition early in January as our initial wish was to have it done by our wedding day in July. However, as most renovations go, we were still doing work that July as our wedding day approached. Even though we did not get it done for the wedding, the amount of time we took to do it paid off as it turned out wonderful and we now use it constantly.
Some of the improvements we made were:
1) shoveled out 60 "industrial" sized garbage bags of sawdust that once acted as some type of insulation and replaced all walls, knee wall, and ceiling with proper insulation
2) Removed 1/4 inch plywood that was acting as wall covering and replaced with proper drywall
3) Added a commercial toilet that cost close to $800 due to the slope needed to drain toilet to stack, However, NOTHING gets stuck in the toilet now!
4) Added a double sink vanity, extra deep tub, and built ourselves a large walk in shower consisting of a bench and double shower heads.
Here is what the finished third floor looks like, I can't seem to find our "before" pictures right now so I will post them when I do!


Tuesday, May 26, 2009
Let's Start at the Begining
Before we tackle the current renovations that are taking place, it is probably a good thing to let you know a little about our house.
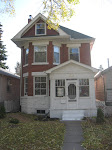
This is our house! It is located in the heart of the Cathedral area in Regina, Saskatchewan. Markus and I purchased this house 3 1/2 years ago in December of 2005. Our house is a 2 1/2 story brick house that was built approximately 1913-1914. The house is really one of the only brick houses of this size and style in our neighborhood and the city. What drew us to this house was its size, style, and that most of the original wood was intact and that it was fairly unaltered from its original form. The hardwood floors are unique as they are done in an interesting pattern that is not commonly found in older homes in this area.
Generally here is what the house consisted of when we purchased it: -All walls were still original lath and plaster (with many years of either paint or crappy wallpaper)
-Main floor consisted of foyer, living room, dining room and a kitchen that had been renovated in approximately 1995
-Second floor consisted of a small den area (possibly once a nursery), master bedroom with fireplace, 2 other bedrooms, a water closet, and tub/sink room
-Third floor was split into three "rooms" one of which was at one time a kitchen area as the third floor had been rented out in the past
-The only "new" electrical that existed was in the kitchen and a bit on the second floor
-The front yard had been landscaped at some point, and the back had a basic cement walkway and basic flower beds
This is the general idea of the house, my next post will outline the first renovations we undertook!


This is our house! It is located in the heart of the Cathedral area in Regina, Saskatchewan. Markus and I purchased this house 3 1/2 years ago in December of 2005. Our house is a 2 1/2 story brick house that was built approximately 1913-1914. The house is really one of the only brick houses of this size and style in our neighborhood and the city. What drew us to this house was its size, style, and that most of the original wood was intact and that it was fairly unaltered from its original form. The hardwood floors are unique as they are done in an interesting pattern that is not commonly found in older homes in this area.
Generally here is what the house consisted of when we purchased it: -All walls were still original lath and plaster (with many years of either paint or crappy wallpaper)
-Main floor consisted of foyer, living room, dining room and a kitchen that had been renovated in approximately 1995
-Second floor consisted of a small den area (possibly once a nursery), master bedroom with fireplace, 2 other bedrooms, a water closet, and tub/sink room
-Third floor was split into three "rooms" one of which was at one time a kitchen area as the third floor had been rented out in the past
-The only "new" electrical that existed was in the kitchen and a bit on the second floor
-The front yard had been landscaped at some point, and the back had a basic cement walkway and basic flower beds
This is the general idea of the house, my next post will outline the first renovations we undertook!


Welcome!
Welcome to our blog! This blog will hopefully be a place that we can show you, friends and family, the progress that we are making on our house renovations.
Subscribe to:
Posts (Atom)